

Materials Required:
1 fat quarter quilting weight cotton for pocket panel
1 fat quarter quilting weight cotton for lining
1 fat quarter lightweight non-woven fusible interfacing
One 4” all-purpose zipper
Prepping:
Note:
Print the pattern pieces provided in the “Duo Wallet” pattern and cut the pattern pieces along the solid black lines. Tape the Main Wallet piece and the Second Zipper Placement piece together, butting the lines at the edge with the matching letter (A).
Trace the pattern piece on the wrong side of the fabric using a water soluble marker and cut the pocket panel. Repeat to cut the non-woven interfacing.
Measure and cut:
Using main wallet pattern pieces of version 1
Cut 1: pocket panel and
Cut 1: non-woven interfacing
Cut 1: 4.5” x 8” for zipper pocket lining
Fuse the non-woven interfacing to the wrong side of the pocket panel.
Instructions:
1. Fold the zipper pocket lining in half lengthwise (8” edge) matching raw edges and press to make a centered crease. On the wrong side of the zipper pocket lining, measure 1” from the short (4.5”) edge and draw a 3.25” horizontal line centered along the crease. Draw another 3.25” line exactly 0.5” from the existing one and connect the ends to make a box as shown in Fig. 1.
 2. Now on the right side of the pocket panel, pin the short (4.5”) edge of the zipper pocket lining centered from the side edges and 1” from the top short edge. The pocket panel and the zipper pocket lining will be right sides together. Sew right along the rectangle.
 3. Inside the stitched rectangle draw a horizontal center line stopping 0.5” from the ends and then to the corners as in Fig. 2. Cut along the lines being careful not to clip the stitching in the corners. Pull the zipper pocket lining through the hole you just cut to the wrong side and press well.
4. Pin the 4” zipper on the wrong side, face down and centered over the hole. Top-stitch the entire way around the zipper on the right side to attach.

5. Fold the loose short edge of the zipper pocket lining up to meet the short edge over the zipper with right sides together. Sew around the 3 open raw edges of the folded zipper pocket lining, using a 3/8” seam allowance, to enclose and create the pocket. Fold the pocket panel out of the way so you don’t sew through it. Trim the seam allowance to 1/8” on all three sides.

6. On the right side of the pocket panel draw a line 8” from the top short edge. Draw another line exactly 4” from the existing line as shown in Fig. 3.

7. Fold the pocket panel along the 8” line such that the right sides are together. Press the fold.
 8. Now fold the pocket panel back along the 4” line creating a slip pocket. The overall size of the pocket panel will now be 4.75” x 9”.

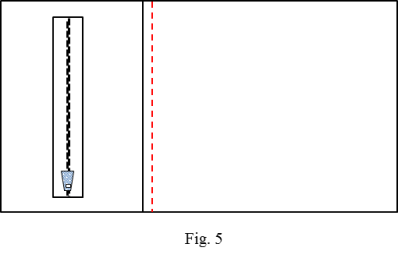
9. Top stitch along the top edge of the slip pocket about 1/8” from the edge as shown in Fig. 5 below, being careful to stitch only along the fold and not through the pocket panel.
10. Baste the slip pocket along each long edge about 1/8” from the edges. Check to make sure the pocket panel is 4.75” x 9” in dimension. Your pocket panel is now ready.

11. Follow the instructions in the “Duo Wallet” pattern to insert the magnetic snap and proceed as in the pattern to attach the pocket panel to the card slot panel and complete the wallet.
